
Crispy Fried Chicken Tendons Recipe
There’s something undeniably comforting about biting into perfectly crispy fried chicken — that golden crust giving way to juicy, tender meat. These Crispy Fried Chicken Tendons capture that magic with just a handful of simple ingredients and a straightforward frying method that delivers unbeatable texture and flavor. The secret lies in the double-dredge coating, which creates a shatteringly crisp crust that seals in every drop of moisture. Ideal for family dinners, game nights, or any occasion where comfort food takes center stage, this dish turns a humble piece of chicken into a restaurant-worthy classic.

Ingredient Breakdown
When it comes to choosing your chicken, both tenders and boneless breasts work beautifully, but they offer slightly different results. Chicken tenders are naturally juicy and cook evenly, while sliced chicken breasts provide a leaner option that crisps beautifully when fried. Keeping the pieces uniform ensures even cooking and consistent crunch.
The flour coating plays a vital role in creating that iconic golden crust. A simple blend of flour, salt, and black pepper forms the perfect balance between flavor and texture. The flour not only helps the chicken brown evenly but also adds the signature crunch that makes this dish irresistible.
Next comes the egg wash — a key step that binds everything together. The combination of beaten egg and water acts like glue, helping the flour adhere firmly to the chicken and creating layers that crisp up beautifully during frying.
Finally, the frying oil is where the transformation happens. Using a neutral oil with a high smoke point, such as vegetable oil, ensures a clean, crisp finish without greasiness. Keeping the oil at the right temperature — between 365°F and 375°F — is essential to achieve that perfect golden brown exterior while keeping the inside tender and moist.
Step-by-Step Preparation Guide
Begin by preparing your chicken pieces, ensuring they’re evenly sliced into 1-inch strips for consistent cooking. This step helps prevent uneven frying and guarantees juicy meat inside every piece.
Next, prepare the coating. In one bowl, combine the flour, salt, and pepper to form a simple yet flavorful base. In another bowl, whisk together the egg and water until smooth. The key is in the layering: first dredge the chicken in the seasoned flour, then dip it into the egg wash, and finally return it to the flour for a second coat. This double dredge technique locks in the moisture, creating an ultra-crispy shell that doesn’t fall apart during frying.
After coating, let the chicken rest for about five minutes. This short resting period allows the coating to firm up and adhere better, preventing it from slipping off once it hits the hot oil.
Heat about two inches of vegetable oil in a heavy skillet or cast-iron pan. To test the temperature, drop a small pinch of flour into the oil — it should sizzle instantly. Working in small batches, carefully lower the chicken into the oil. Avoid overcrowding the pan, as this drops the temperature and results in soggy chicken. Fry each batch for 8–10 minutes per side until deeply golden and crisp.
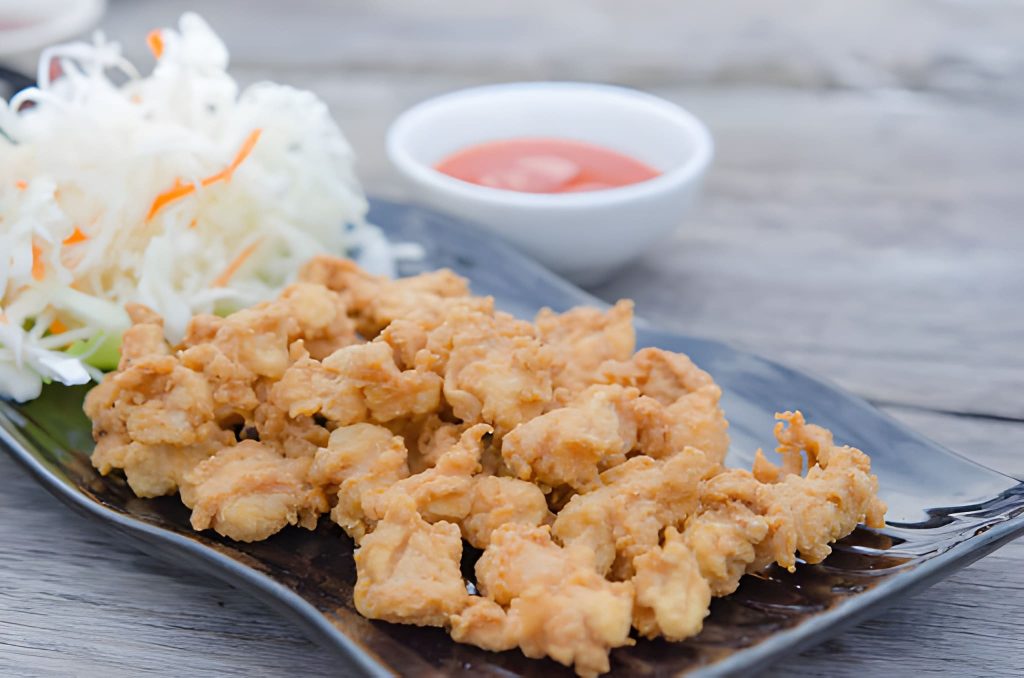
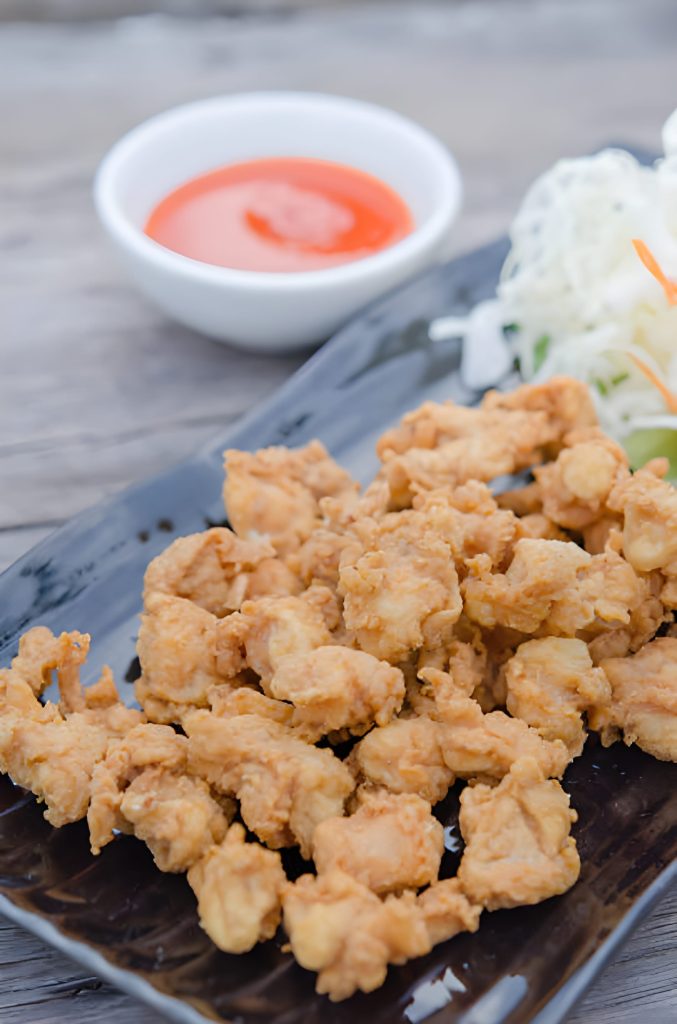
Once cooked, transfer the chicken to a paper towel-lined plate to drain excess oil. While still hot, sprinkle lightly with salt to enhance flavor. The result is golden perfection — crispy on the outside, juicy on the inside, and ready to serve.
Recipe Tips
Maintaining the perfect oil temperature:
Keep the oil between 365°F and 375°F for a crisp crust that doesn’t absorb excess oil.
Avoiding soggy coating:
Let the coated chicken rest before frying to help the flour bind firmly.
Using tongs or chopsticks:
These tools make flipping easier and prevent the coating from breaking.
Reheating leftovers:
Reheat in an oven or air fryer to restore crispiness without drying out the chicken.
What to Serve With This Recipe
For a truly comforting meal, pair these crispy tenders with creamy mashed potatoes or hot, seasoned fries. The crisp chicken contrasts beautifully with the smooth texture of the sides. Add a pop of freshness with a bright coleslaw or a simple green salad dressed with lemon vinaigrette.
When it comes to dipping sauces, the possibilities are endless. Try honey mustard for sweetness, spicy mayo for heat, or garlic aioli for a rich, savory touch. For a Southern-inspired spread, add warm buttermilk biscuits or cornbread on the side — perfect for soaking up any flavorful crumbs left behind.
Creative Variations
For those who love spice, adding cayenne pepper or chili powder to the flour mixture gives the coating a fiery kick. To infuse more depth, mix in herbs like thyme, oregano, or smoked paprika for aromatic notes that complement the chicken’s richness. If you prefer a lighter approach, the same double-dredge method can be adapted for oven-baking — simply brush the chicken with a touch of oil and bake until crisp for a healthier yet satisfying alternative.
Frequently Asked Questions
Can I use panko breadcrumbs instead of flour?
Yes, panko can be used for extra crunch, though the traditional flour coating provides a more classic Southern-style texture.
How can I tell when the chicken is fully cooked?
The internal temperature should reach 165°F, and the juices should run clear when pierced.
What’s the best oil for frying chicken tenders?
Neutral oils like vegetable, canola, or peanut oil work best due to their high smoke points.
Can I prepare the chicken ahead of time and fry later?
Yes, you can coat the chicken and refrigerate it for up to an hour before frying. Let it sit at room temperature for a few minutes before cooking.
How do I store and reheat leftovers without losing crispiness?
Store in an airtight container in the fridge for up to two days. Reheat in an oven or air fryer at 375°F until hot and crisp.
Crispy Fried Chicken Tendons are a perfect balance of crunch, tenderness, and flavor — a true comfort food classic that never disappoints. Whether served as a family favorite, a crowd-pleasing appetizer, or a simple weekend treat, each bite delivers that unmistakable golden crunch. With a few easy techniques and everyday ingredients, this recipe transforms ordinary chicken into an irresistible dish that will have everyone reaching for seconds.
Ingredients
1½ cups all-purpose flour
1–2 pounds chicken tenders or 2 large boneless, skinless chicken breasts sliced into 1-inch strips
¾ teaspoon salt
½ teaspoon black pepper
1 egg, beaten with 2 tablespoons water
Vegetable oil, for frying
Instructions
Pour about 2 inches of vegetable oil into a 9-inch cast-iron skillet or heavy-bottomed frying pan. Begin heating it over medium-high heat while preparing the chicken coating—keep a close watch on the oil as it warms.
In a large mixing bowl, combine the flour, salt, and pepper. In a separate bowl, whisk together the egg and water until smooth.
Coat each piece of chicken thoroughly in the seasoned flour, shaking off the excess. Dip the floured chicken into the egg mixture, then return it to the flour for a second coating. This double dredge creates a crisp, golden crust once fried.
Arrange the coated chicken strips on a plate and let them rest for about 5 minutes—this short resting time helps the coating adhere more firmly during frying.
Check the oil temperature using a candy thermometer; it should reach 365°F to 375°F. If you don’t have a thermometer, test by dropping a pinch of flour into the oil—it should sizzle immediately. Once the oil is ready, carefully add a few chicken pieces (about 5 at a time) to avoid overcrowding.
Fry the chicken for 8–10 minutes on one side until it turns a rich golden brown. Flip each piece and cook the other side until evenly crisp and cooked through. Repeat the process in batches until all chicken is fried.
Transfer the cooked tenders to a paper towel-lined plate to absorb excess oil. While still hot, sprinkle lightly with salt for extra flavor. Serve warm, showcasing the crunchy coating and juicy, tender interior that make these fried chicken tendons irresistible.

Crispy Fried Chicken Tendons Recipe
Ingredients
- 1½ cups all-purpose flour
- 1 –2 pounds chicken tenders or 2 large boneless skinless chicken breasts sliced into 1-inch strips
- ¾ teaspoon salt
- ½ teaspoon black pepper
- 1 egg beaten with 2 tablespoons water
- Vegetable oil for frying
Instructions
- Pour about 2 inches of vegetable oil into a 9-inch cast-iron skillet or heavy-bottomed frying pan. Begin heating it over medium-high heat while preparing the chicken coating—keep a close watch on the oil as it warms.
- In a large mixing bowl, combine the flour, salt, and pepper. In a separate bowl, whisk together the egg and water until smooth.
- Coat each piece of chicken thoroughly in the seasoned flour, shaking off the excess. Dip the floured chicken into the egg mixture, then return it to the flour for a second coating. This double dredge creates a crisp, golden crust once fried.
- Arrange the coated chicken strips on a plate and let them rest for about 5 minutes—this short resting time helps the coating adhere more firmly during frying.
- Check the oil temperature using a candy thermometer; it should reach 365°F to 375°F. If you don’t have a thermometer, test by dropping a pinch of flour into the oil—it should sizzle immediately. Once the oil is ready, carefully add a few chicken pieces (about 5 at a time) to avoid overcrowding.
- Fry the chicken for 8–10 minutes on one side until it turns a rich golden brown. Flip each piece and cook the other side until evenly crisp and cooked through. Repeat the process in batches until all chicken is fried.
- Transfer the cooked tenders to a paper towel-lined plate to absorb excess oil. While still hot, sprinkle lightly with salt for extra flavor. Serve warm, showcasing the crunchy coating and juicy, tender interior that make these fried chicken tendons irresistible.